Friday
Sep022011

DIY: String Globe Shade

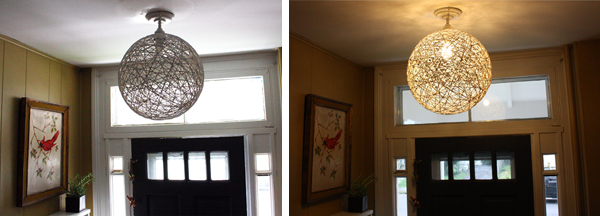
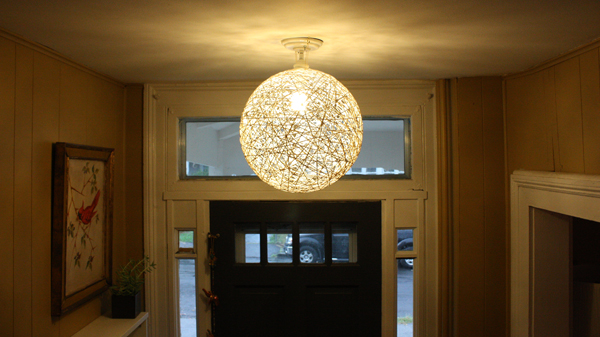
Our downstairs entryway was in need of a new light fixture - a bare bulb is hardly welcoming.  However, as a freelance designer I'm always on tight budget and everything I liked left me deciding between the new fixture and groceries for the month.  So, I came up with a DIY lamp shade that would fit over the pendant fixture and bulb already in place.  The total cost for this gorgeous, modern light fixture shade?  A mere $5.

If you have a couple hours, five bucks, water and flour, you can make this string globe shade over your next free weekend.  Instructions are below. 

Supplies

  • 1 cup white flour
  • 1 cup water
  • 1/2 cup craft glue
  • 100% cotton yarn/string (I used a spool of 120 yards)
  • balloon or ball that can be popped  (note:  if you want perfectly round globes, you're best off using a ball.  Balloons tend not to blow up perfectly round and they also deflate and change shape.)

Instructions

Making the Shade

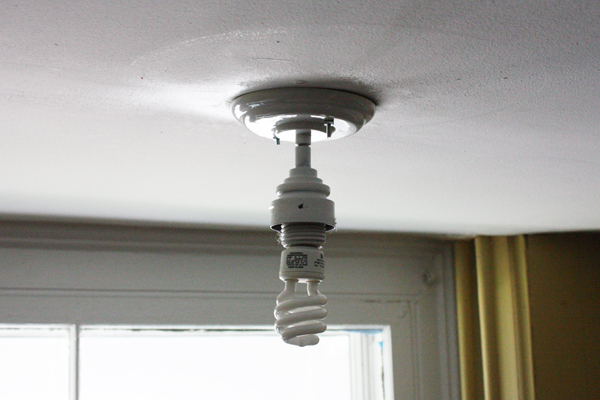
1.  Install some kind of pendant lamp and determine how large you want your globe shade.  Make sure it won't be knocking anyone on the head and that the light bulb won't be touching any sides of the shade.

2.  Mix up your papier mache solution:  in a large bowl combine the flour, water and craft glue.  You want the solution to be somewhat thin - not watery, but also not thick like cake batter.  The solution should drip and not clump.  Add more water if it's too thick, add more flour if it's too thin.


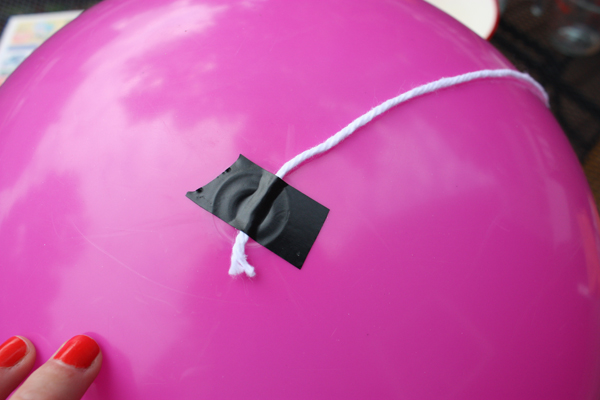
2.   It helps to tape one end of the string to the balloon or ball before you start. Masking tape would be best, but I used electrical because I was too lazy to walk upstairs.

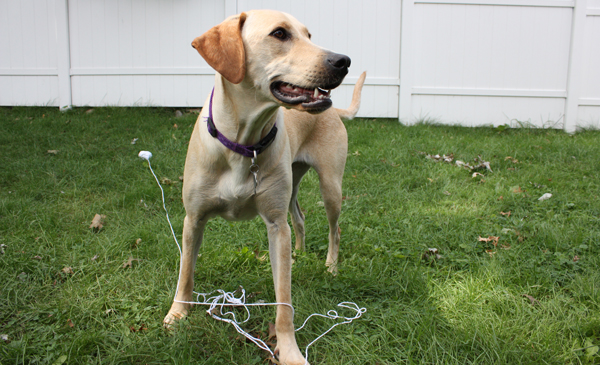
3.  Now is about the time that my dog got mad at me for not paying attention to her.  If you have a dog or cat you should occupy them with a chew toy or cat nip before you start this project.

4.  The next step is the bulk of the project.  The string should be soaked in the papier mache solution before you start wrapping it around the ball/balloon.  Don't be afraid to wrap tightly.   If you run out of yarn and want to start a new spool just tuck the new end under a criss-cross and keep wrapping.

tip:  when you wrap the string, choose one area to keep clear from string.  This space should be big enough to go over the light bulb.  If you're not able to do this don't worry, you can alway snip clear an area with scissors once the string is dry.


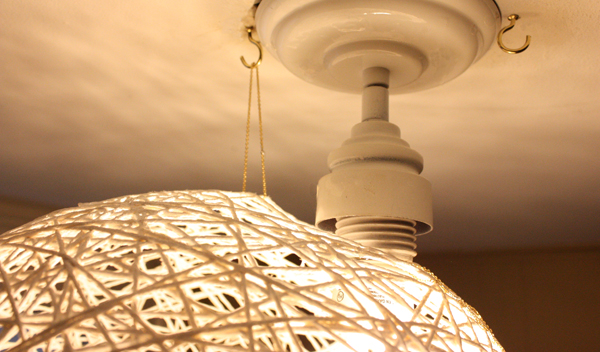
5.  Let your finished globe dry for a minimum of 24 hours.  In humidity and cooler weather you may have to let it dry for up to 48 hours. 

 6.  Make sure your string is totally dry and then comes fun step:  POP! your ball/balloon and carefully remove the debris.

7.  Optional.  Place your string globe in large cardboard box and use spray paint to brighten up the white, change the color, or add gloss to the string.  Let it dry according to the can's directions.

Hanging the shade

1. Test how your shade will cover the light bulb and if necessary, use scissors to snip away the string.  

2. The shade can be hung in a few ways.  I used cup hooks and gold chain to hang mine.  Cup hooks easily screw into the ceiling by hand. 

3.  Enjoy your beautiful new globe shade!

Tuesday
Aug302011

Hurricane Irene

Saturday night we were partying until the wee hours as we celebrated the nuptials of Margot and Matt.  Little did we expect to be woken up at 8am Sunday morning with word that we had minutes to evacuate town before the bridge was swallowed up by the overflowing river.  Some people from our crew fled and made it to surrounding towns, but about 10 of us decided to stay put at the Emerson Resort.

No one really expected Hurricane Irene to have such an impact on upstate New York.  All attention had been on the coastlines, Manhattan, Long Island, etc... but it turned out that those areas did better than expected.

In the Catskills, roads and bridges were wiped out by overflowing rivers and creeks, trapping people in their homes and leaving towns cut off from help.   People lost their houses, cars and businesses to floods and raging rivers carrying entire trees like battering rams.  it was really scary and sad.  Luckily we were at the Emerson and they continued to treat us like guests despite the hotel running on a generator and being used as a shelter.  Not to mention, it's not the worst thing in the world to be stuck in a lovely hotel with 10 of your close friends, crappy movies, bottles of wine, and lots of snacks.  

It wasn't until we were finally able to leave Monday that we saw the ongoing destruction.  It took us almost 8 hours and over 350 miles to travel home in what normally would take 1 hour and 50 miles.


Tuesday
Aug302011

Margot and Matt Get Married!

This weekend was the beautiful wedding of Margot and Matt.  It took place in the Catskills of New York where we were surrounded by mountains, trees, rivers and a seriously awesome group of people.   Congratulations to a very special duo!!!! You'll have a lifetime of happiness together.

Hurricane Irene was looming near as the weekend festivities began Friday night with a fancy BBQ dinner, but she stayed away long enough for us to enjoy the scenary and toast marshmallows at the s'mores station.


Saturday was the BIG DAY and about 10 of us girls drove from the Emerson Resort to the Onteora Mountain House sip champagne while Margot put on her face.  Margot is the most stylish person I know and she seriously delivered with her wedding outfit.  Meredith and I had a photoshoot of Margot's wedding shoes for a good 15 minutes.

Alas, the forecasted hurricane started to sweep in just as we were leaving the Emerson for the wedding at the Onteora.  Honestly, we hardly noticed the gray skies and rain.  The views were still spectacular and the pavillion was warm and bursting with colors.

At the reception we had a delicious dinner and dessert, sweet toasts to the bride and groom, and dancing...LOTS and lots of dancing.

Saturday
Aug202011

DIY: Chevron Frosted Bathroom Window

Our upstairs bathroom gets great light, but it faces the street so it's not really appropriate to leave them uncovered.  We have mini-blinds in the window right now, but I hate having those dust collectors in my clean bathroom.  I saw this tutorial on Seventh House from the Left via Pinterest for using frosting window film to create patterns on the window.

We still have the mini blinds on the top part of the window for now - stay tuned for whatever I end up doing on that half of the window.  I'm thinking some sort of Roman shade.

I created a chevron pattern on a piece of cardboard and used it to trace and cut pieces of frosted film paper from Ikea.  The hardest part was spacing out the zig zags on the window.  This took me hours to figure out - math has never been my strong suit.  I tried measuring out the spaces on my computer, but in the end it was easier to just eyeball it by Scotch taping the cut-outs on the window. 

Once I had the cut-outs in place, I cleaned the glass and applied them to the window one-by-one.  Using rubbing alcohol and a paper towel cleaned the glass perfectly with no streaks.

The new window looked so nice I had to spruce up the mini blinds a little bit by replacing the plastic pulls with a piece of cut glass from an old chandelier. 

Friday
Aug052011

Fashionable Hippie Babies

I've been on a bit of a tie-dying bender these last couple weeks. I decided to venture into some gifts for the baby friends in my life. Next stop: Baby's First Phish Show!